
|
How
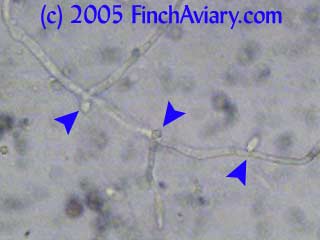
to Do Your Own Fecal Smears
General Information: Introduction | What About My Avian Vet? | Why Do My Own Fecals? | What Can A Fecal Smear Identify? | What Can't A Fecal Smear Identify? | What is a Fecal Float? | What Do I Need to Perform a Fecal Smear? | The Process Images of Normal Findings: Normal Background Material | Normal Movement Images of Abnormal Findings: Candida Yeast | Avian Gastric Yeast | Coccidia | Threadworm Eggs | Motile Flagellate Protozoa As bird keepers - whether pet owners or breeders - it is our responsibility to ensure that our feathered charges are in good health. Unfortunately, birds are excellent at hiding illness. In the wild, a bird that shows signs of weakness is an easy target for predators. Over time, they have evolved to hide illness until the problem is well established and more difficult to treat. This works to their advantage in their natural habitat, but to their disadvantage in our homes and bird rooms. I had been watching one of my blue-capped cordon bleus for a month or two because I hadn't heard her sing for a while and because she had ceased to show interest in her mate. Both symptoms often occur in perfectly normal birds and I was not too alarmed. However, there was always the possibility that such a personality change could be caused by illness, so I was observing her carefully for any physical indication of a problem. When she became a little fluffed and I noticed her sleeping during some more active periods in the aviary, I knew something was wrong. I moved her to a hospital cage and made an appointment with my avian vet. Upon initial examination, she looked fine: no respiratory problems, good weight, droppings appeared normal, she was not egg bound, and she hid her fluffed appearance well. So the vet did a fecal smear. Within a minute, he called me back to have a look at the results. The culprit: Candida yeast. Under the microscope, I could see many budding yeast organisms (two oval objects connected at one end) and also yeast with pseudohyphae (branching yeast that looked kind of like a sprouted seedling). It looked like the infection was pretty well established, given the extensive branched nature of some of the pseudohyphae and the number of organisms present. I asked the vet if it was possible for me to perform this test from home with my own microscope to catch this kind of problem early. He said it was, as long as my microscope could magnify at around 400x (the organisms are visible at 100x, but in order to positively identify them, a higher magnification is required). He suggested I give it a try before I started treating the bird. I did, and sure enough, I saw the same organisms under my scope. As I treated my bird (.03-.04cc Nystatin, orally, twice daily and Avi-Culture sprinkled on the food), I continued to monitor the droppings. After only a couple days of treatment, the number of yeast organisms had dropped, and those that I found were not as developed as many I had seen earlier. I was able to monitor the progress of the treatment and evaluate whether the medication was working. I was also able to do a spot check on some of the other birds to try to determine whether the yeast infection had spread. I could report back to the vet when the medication failed to completely eliminate the yeast and he was able to prescribe a different medication without me needing to bring the bird back in. Unfortunately, in this case, it appeared that the yeast had spread beyond the gut, as both Nystatin and Ancoban could reduce the yeast to a certain level, but neither could eliminate it. The bird eventually passed away despite treatment. Had I known how to do a fecal smear prior to bringing in my bird, I may have been able to catch the illness before it had become systemic. Performing a home fecal smear does not replace your vet. Your vet's experienced eye will enable him or her to see things that you don't. He/she can make connections between the symptoms and the microscopic findings. Some findings frequently occur as a secondary problem to another condition, and treating the secondary problem is useless if you do not also eliminate the source. Your vet is more qualified to make that connection. Your vet can also provide you with medications that may be more effective than those you can get over the counter and is much better versed at selecting the best medication and dosage for your birds. A vet can help you with suggestions for changing your practices to prevent the problem in the future. He or she is likely to be more current on the latest avian research. The results of a fecal smear may be more specific than say "puffed bird sleeping a lot" - but they still may not provide the complete picture that your vet might be able to give you. For these reasons, you should always use home fecal exams in conjunction with your vet to provide your birds with appropriate care. Early Detection - The greatest benefit to doing fecal smears from home is early detection. You may be able to recognize an illness earlier in a bird with vague or no symptoms. Early detection is very important to successful treatment, especially in small birds. After seeing your vet, you can monitor a bird's progress daily and provide your vet with more accurate phone updates, perhaps even eliminating the need for some follow-up visits that might further stress the bird. Monitor Exposed Birds - If a sick bird was housed in the company of other birds, the other birds are at risk. It is not feasible to take a flock of birds to the vet to determine whether or not they have contracted the illness. Instead, we clean, disinfect, watch, and wait to see if others develop symptoms. Sometimes we randomly select birds to bring in. In some cases, we treat the entire flock without knowing whether others are infected. Doing fecal smears from home gives you better information about the status of the exposed birds, affording you more treatment options. Quarantine - Performing home fecal smears can be helpful when quarantining new birds, helping aviculturists to better assess the condition of the new birds before introducing them to the rest of the flock and potentially exposing the flock to new pathogens. Screening Sale Birds -Home fecal smears could be used to screen birds about to be put up for sale. No one wants to sell a sick bird. It is bad for the bird, bad for the new owner and his or her existing birds, and bad for the breeder's reputation. Yet birds can hide illness well, so any technique that helps ensure sick birds stay home and receive proper treatment is welcomed. Routine Screening - Home fecal smears can be implemented as part of a routine screening program - periodically testing some random droppings from the aviary in an effort to discover certain illnesses before symptoms appear. We just have to remember that fecal smears can only identify a limited number of problems, so a normal smear does not mean a healthy bird. Identifying Problems that Can Only Be Seen Intermittently - Some conditions can only be identified in droppings periodically. Protozoa, for example, are shed intermittently. Avian Gastric Yeast (Megabacteria) can be shed in very small numbers, such that it might take some diligence to recognize it and it the number present may even be considered normal, but then suddenly the bird will pass a stool that is just loaded with them. Your vet has just a few opportunities to collect droppings from your bird, and it is possible that he/she might not get the key sample they need to recognize the problem. From home, you have the opportunity to take more samples over a period of time and possibly recognize a problem that was not evident at the time of a vet visit. Avoiding
Inappropriate Use of Medication
- Finally, for those who are going to treat themselves regardless
(perhaps you do not have access to a good avian veterinarian
and have no other choice), performing a fecal smear might
at least prevent you from making such mistakes as treating
with an antibiotic when a yeast infection is present (antibiotics
will actually help the yeast organisms to thrive - in fact,
they are actually the cause of many yeast infections). With
more and more organisms becoming resistant to conventional
medications, it is important that the appropriate medications
be given for the condition at hand. But again, an avian veterinarian
is best qualified to make this decision. What Can a Fecal Smear Identify? Worm Eggs - A fecal smear can identify many types of worm eggs. Many are large and plentiful and easy to identify even at 100x magnification. Some are smaller and less plentiful, and may require a fecal float (dissolving the dropping in a supersaturated saline or sugar solution in which the worm eggs will float but the fecal material will sink). Fecal floats remove background material from the slide so that the worm eggs can be more easily detected, and they allow you to analyze an entire dropping from larger birds, but they cannot be used to identify yeasts or protozoa. Yeast - Yeast organisms, such as Candida (photos below) and Avian Gastric Yeast (photos below) can also be identified via fecal smears. These organisms can be seen at 100x, but are much easier to identify at 400x. Protozoa - A fecal smear can also identify some protozoa. However, a high magnification may be necessary here (at least 400x, and even better, 1000x). In order to view slides at 1000x, an oil-immersion lens is needed (you place oil between the lens and the slide so that you no longer view through air - just oil and glass). Motile flagellate protozoa, such as Trichomonas, Giardia, Cochlosoma, and Hexamita (see below), can be seen on a fecal smear, although it might be difficult to determine which protozoa you are viewing. In these cases, you are likely to notice the disturbance in the background material before you actually view the organism. Like worm eggs, Coccidia (single-celled parasitic protozoans) can be identified in fecal smears via the oocysts that are expelled in the dropping. Mites
- On occasion, a fecal smear can identify a potential feather
mite problem. This would be the case if the bird has ingested
the mites via preening and excreted them in their droppings.
Mites are probably more likely to be identified in other ways,
however. What Can't a Fecal Smear Identify? Most bacterial organisms are too small to be identified via a microscope. You will be able to see bacteria, but you will not know whether they are beneficial gut flora or harmful bacteria. You can perform a gram stain to determine the likelihood that the bacteria present are beneficial or harmful, but this requires special dyes, strict adherence to the proper procedure, and interpretive skills. Gram stain kits can be purchased on the Internet for around $20. To identify specific bacteria, however, cultures are necessary. Viruses cannot be identified via a fecal exam. Respiratory problems also cannot be identified via a fecal exam, although a crop smear might identify some problems. A fecal float is another procedure that may be performed in place of a fecal smear. Fecal floats have the advantage of filtering out most of the background material, so identifying worm eggs and oocysts becomes easier. This is especially advantageous with Coccidia, where the oocysts are small and can easily be confused with background material. Fecal floats can also be performed on larger samples, so there is less chance that a pathogen will be missed in the untested part of the sample. However, floats will not identify yeast infections such as Candida or Avian Gastric Yeast, nor can they identify protozoa. If you are interested in learning more about floats, Yul, a pigeon rehabber, has posted a very nice web album with photographs detailing the steps and the results on Webshots.
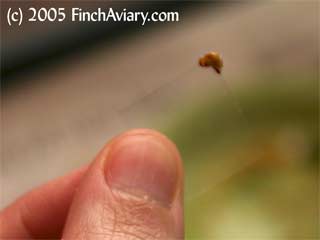
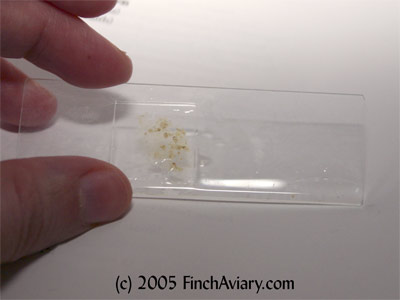
Scrape up a fresh sample of droppings and place on the slide. The sample must be fresh and soft - a dried sample will not work. For waxbills, the entire dropping can be used. For finches with larger droppings, you may only need about half the dropping. For larger birds, it is best to take a small sample from various parts of the dropping and analyze them individually on separate slides. You only need a small amount - 2 or 3 square mm.
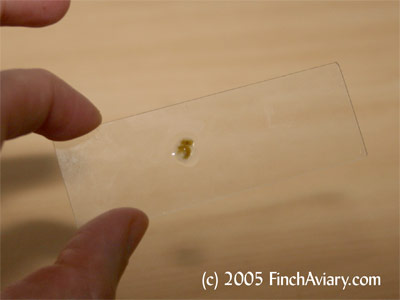
Add a drop or two of saline solution to the sample. Using a toothpick or similar item, mix the dropping with the saline solution to get it to dissolve a little. Place the cover slip on top of the dropping, and press down gently on the center. Slide the cover slip around a bit on the slide, trying to distribute the dropping mixture into a very thin layer through which light can penetrate. Make sure there is no debris, such as seed hulls or grit, preventing the cover slip from laying flat on the slide.
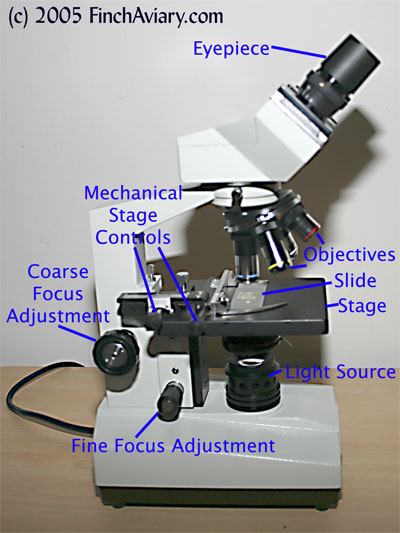
Place the slide on the microscope stage and turn the microscope on. You may want to canvas the slide at 100x first. If you find something interesting, center it under the lens, then switch to a higher power to view it more clearly. Use the microscope's coarse focus to bring the slide contents into focus. Then use the fine focus adjustment to look through the different layers of the smear. Note that you will miss a lot if you do not adjust the fine focus throughout the depth of the smear. The smear is not so thin that everything can be seen at one fine focus adjustment. If your
entire slide consists of plant material and fecal debris (brownish/yellowish
color), you won't be able to see very much. You need to use
a smaller fecal sample and dilute more with saline solution.
Many of the organisms will be apparent in the clear solution
portions of the slide (white background). My USB microscope camera is one of the extremely cheap ones and takes grainy, somewhat fuzzy, low-resolution images that leave a lot to be desired. However, it is good enough to get a general idea of what each subject looks like. Note that all of the subjects photographed below were clearly viewed by me at the magnifications noted. However, the microscope camera severely crops the field of view, so what you see here is actually only about a fourth of what can actually be seen through the scope. Plant MaterialPlant material is likely to be abundant in the droppings and is very easy to recognize. It will consist of tissues with a definite cellular pattern, and it will not be as transparent through the light. Plant material frequently is a yellow to brown color.
Feather
Material
Air
bubbles
Spherical
Pollen
Urate
Crystals
Fungal
Macroconidia - new 7/18/05
Most of the time, the things you see under the microscope are pretty sedentary. However, sometimes you might notice movement. This can be an indication of protozoal activity, but it can also be quite normal. The following motion is normal and no cause for alarm. Flowing
Motion Brownian
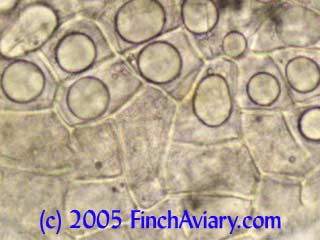
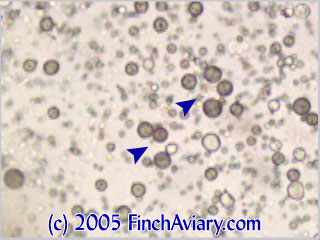
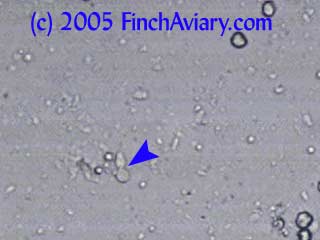
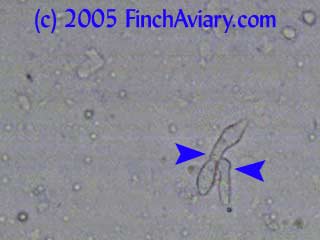
Motion Images of Budding Yeast and Pseudohyphae (Candida) Budding
Yeast
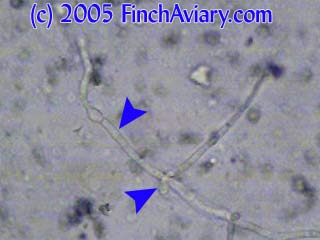
Pseudohyphae
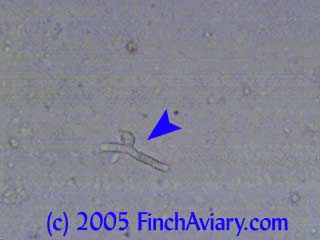
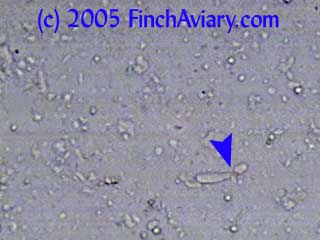
The following images were taken after treatment had begun. The pseudohyphae became sparse, and when I did find them, they were not as complicated as many of the original organisms.
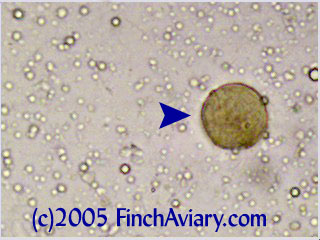
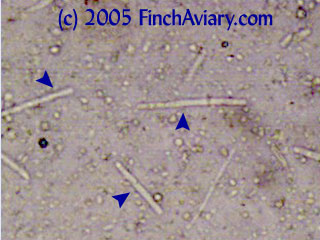
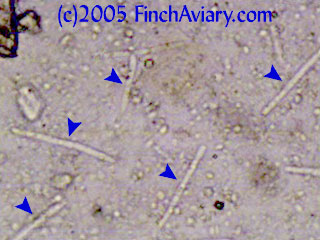
Images of Avian Gastric Yeast (Megabacteria) - new 5/14/2005 The following images were taken from one of my zebra finches. Despite showing no symptoms, he was infected with Avian Gastric Yeast (AGY), which I detected while screening my birds for the protozoa described below. These images came from a dropping in which a large number of organisms were shed. Subsequent droppings yielded much fewer organisms. This behavior is typical of AGY, and is why it is a good idea to keep monitoring a bird if even only a few AGY organisms are found.
While this bird had no symptoms, my masked grassfinch died years ago after attempted treatment for AGY. That bird had symptoms identical to Candida (occasionally fluffed, sleeping a lot when other birds were active, appearing to eat a lot). Avian Gastric Yeast is sometimes blamed for the condition referred to as "Going Light." The organism differs from Candida under the microscope in that there are no budding yeast organisms, nor are there any branching yeast (pseudohyphae). Avian Gastric Yeast organisms are clearly detected as long, straight rods (once thought to be very large bacteria, hence the old name Megabacteria). While these rods were visible at 100x, the 400x magnification was needed before I could identify them. My vet prescribed Amphotericin B suspension (.01 cc orally once a day), the only somewhat effective treatment available. I recommend using the oral suspension, which is available from your vet, on an established infection, since I do not believe the water-soluble version is very effective when the infection has progressed this far. Amphotericin B is quite toxic, so it should only be used when indicated. Even the
Amphotericin B suspension is only effective in about half
of the cases. In other cases, you are out of luck. Once cured,
there is a good chance the infection will return, so occasional
screenings might be useful. I have heard that AGY can be transmitted
to young when feeding, so some recommend fostering eggs or
chicks rather than allow them to be reared by an infected
parent. Better still - remove the infected bird from your
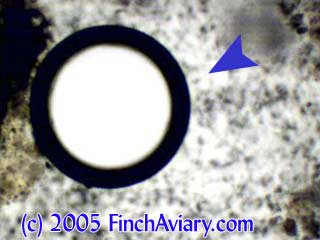
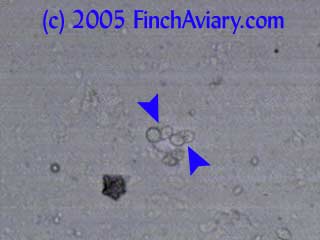
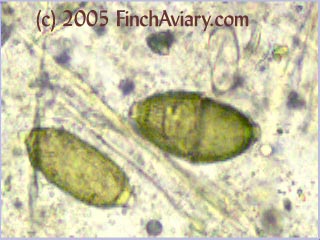
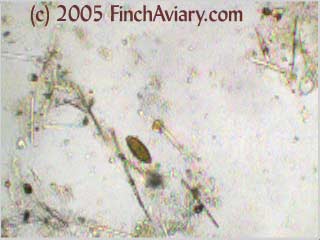
breeding program. Images of Coccidia Oocysts - new 6/5/2005 Coccidia is a protozoa that can be detected in a fecal smear via the presence of oocysts (think of oocysts as being like eggs). Two different types of coccidia infect birds: Isospora genus and Eimeria genus. Isospora oocysts clearly have two sporocysts (masses within the center of the oocyst). Eimeria have four, but you likely will not be able to distinguish them and they will appear as one large mass in the center of the oocyst. You will need to view at 400x in order to detect them.
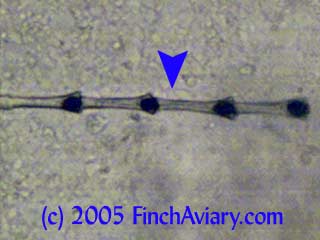
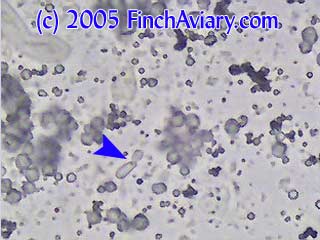
The photos above were taken from a smear of a newly acquired bird in quarantine. The bird was completely asymptomatic, so I have no symptoms to report, although diarrhea and "fluffed appearance" are frequently described in symptomatic birds. The genus here is likely Eimeria spp. My microscope camera did a very poor job depicting this center mass, even when I used the oil immersion lens at 1000x. However, the top photograph on page 33 of Under the Microscope by Dr. Danny Brown is an exact representation of what I saw. I thought perhaps the first one I found was spherical pollen that had lost its coloration. When I saw many more throughout the sample, I knew something was wrong. Luckily, I implement home screening of all new birds throughout quarantine and was able to detect the problem before it could be spread to other birds. Images of Threadworm Eggs - new 11/16/2005 Thanks to my friend Rick, a falconer, I was provided with a poop sample from a red-tailed hawk. It is very common for wild hawks to carry worms, so I checked. Sure enough, the poop sample was filled with tiny threadworm eggs. The eggs were easily visible, many to a frame at 100x. At 400x, they were quite large and obvious. Threadworm eggs can be easily identified based on their shape. They are shaped like long ovals and have little caps at each end.
Video of Motile Flagellate Protozoa - new 5/14/2005 Flagellate protozoa can be detected by observing unusual movement in the background material (eg, jittering, dancing, spinning urate crystals), then looking in the area of movement for the causative organism. To verify that you are not seeing Brownian motion (described above), use the fine focus adjustment to carefully focus in the area of movement until you find the actual organism, which is very nearly transparent, bumping into background material. If you are lucky, you might see the flagella, a hair-like structure that will whip out from the body of the protozoa and cause it to move or spin. You will need to view at 400x or greater in order to detect the protozoa. Some protozoal organisms do not survive long outside the body, so you need to analyze a fresh dropping quickly in order to detect them. Because my microscope camera is of too low quality to get a clear picture of the organism and because movement is really the key to spotting it, pictures are useless. Instead, I attempted to capture a video. The smear used was not the best for viewing the protozoa, but by the time I had the computer and camera hooked up and the appropriate video software installed, I was only able to look at one more smear before losing the bird. In this (very low quality) video, I have pointed out the following in this order: what I believe is the organism moving, then another organism appearing in the same frame, the flagella whipping out on an organism that has ceased moving (hard to distinguish in the video), and the background material being disturbed by the organism (a clue to look for the protozoal organism to rule out Brownian motion). SELECT
THE FORMAT OF YOUR CHOICE: The organism in the video moves a lot like Trichomonas, which although usually detected via a crop smear, can also sometimes be shed in the droppings (according to my vet). However, the usual symptoms of Trichomonas, including vomiting and white lesions in the mouth, were not present. Other possibilities include Giardia, Cochlosoma, and Hexamita, although in my amateur opinion, it was not moving in a way consistent with the Hexamita. Fortunately, the treatment options for most flagellate protozoa are the same, so identifying the exact type is not a primary concern. For those interested in differentiating some of the species (Trichomonas, Giardia, and Hexamita) based on movement, the Exotic DVM website has excellent videos in which the organisms move freely without impedance from the background material. My infected
society finch died before I could treat it, but protozoa are
very infectious, so all birds needed to be treated and the
aviary disinfected with bleach. Ronidazole (the active ingredient
in Ronivet-S) is frequently used to treat protozoal infections.
I was advised to use this at 4x the recommended dosage (1/8
tsp per 125 ml), but always follow your vet's instructions.
Metronidazole is also used, but it is bad-tasting, and recent
reports show that Giardia is becoming increasingly resistant
to it. After a week of treatment, my vet examined a sample
of my birds and did not see any further evidence of protozoa. Further Reading If you are interested in learning to do your own fecal smears, fecal floats, or gram stains, I highly recommend the book Under the Microscope: Microscope Use and Pathogen Identification in Birds and Reptiles by Dr. Danny Brown. This book can be purchased from www.avianpublications.com or www.ladygouldianfinch.com. This book will teach you about the parts of a microscope and how to use one (helpful if your microscope does not come with a manual and you no longer remember what you did in high school science), as well as how to do a fecal smear, a fecal float, and even information on doing a gram stain. It is written for aviculturists and herpetologists, rather than for veterinarians and veterinary technicians, and is filled with illustrations of both normal background material and abnormal organisms and parasite eggs commonly found in bird and reptile droppings. Recognizing normal and abnormal findings will take much experience (I have just started on this journey), but it is helpful to have a reference to refer to turn to while you work your there. If you would like to discuss this topic and share photos and insight with others interested in the same thing, consider joining the Avian Microscopy Yahoo! Group. This is a new group formed by individuals interested in exploring this topic further.
Click
Previous to return to Our Tragic Experience| Click Next to
read about Personality Conflicts
|


|
|
|
|
|


HOME | CONSTRUCTION
| CARE | BIRDS
| ACCESSORIES | BACKGROUND
AVICAM | GALLERY
| GUESTBOOK | LINKS
| SEARCH
SITE MAP | DISCLAIMER
| CONTACT US
(c)2005 FinchAviary.com